Standalone UTM applications can be converted directly to UTM cluster applications in the case of UTM applications as of version 7.0.
If you want to convert a standalone UTM application < V7.0 into a UTM cluster application then you must first convert it into a standalone application version 7.0.
Activities before conversion
Before conversion, you have to check the following points and make adaptations if necessary:
Application code
It is not necessary to adapt the code of the application unless
the global memory areas AREA and shared memories are used, because these lose their global nature in the UTM cluster application.
other application-specific resources are used whose functionality must be available across the entire cluster when migrating to a UTM cluster application.
UPIC clients
You only need to adapt the UPICFILE for UPIC clients whose paths to the UTM applications have been configured statically in the UPICFILE.
You must adapt the UPICFILE and the client program for UPIC clients that dynamically configure their paths to the UTM applications using SET calls.

For detailed information on adapting UPIC clients, refer to the manual „openUTM-Client for the UPIC Carrier System”.
Performing the Conversion
A standalone UTM application is running on one node. It is to be converted to a UTM cluster application that is to run on several different nodes:
Proceed as follows:
First install openUTM V7.0 on all the nodes.
Extend the generation statements for a new KDCDEF run as follows:
>
Define the cluster-specific name prefix as the storage location for the files that are global to the cluster (CLUSTER statement, CLUSTER-FILEBASE operand).
>
Configure each node with one CLUSTER-NODE statement per node.
Run the KDCDEF utility with OPTION GEN=(CLUSTER,KDCFILE):
The new initial KDCFILE is generated and the UTM cluster files of the UTM cluster application are created.
Terminate the standalone UTM application on the computer.
Back up the KDCFILE of the standalone application for the subsequent KDCUPD run.
Make the new cluster files generated by KDCDEF, the initial KDCFILE and the old KDCFILE available under the base names which you specify in CLUSTER-FILEBASE NEW=, KDCFILE OLD= and KDCFILE NEW= in the cluster update.
Use KDCUPD to perform a cluster update. When you do this, the data that applies globally at cluster level is transferred from the old KDCFILE of the standalone application to the UTM cluster files.
>
Make the new UTM cluster files and the old and new KDCFILE available under the base names specified below. For the new KDCFILE, you can use either the initial KDCFILE or the KDCFILE of a node application. In this case, the KDCFILEs are only used for various checks. The content of the new KDCFILE is not changed.
>
Perform the KDCUPD run with the following statements:
CLUSTER-FILEBASE NEW=cluster-filebase

                    KDCFILE OLD=filebase-old,NEW=filebase-new

                      TRANSFER ...
Explanation
cluster-filebase
Base name of the new UTM cluster files generated by KDCDEF. KDCUPD transfers the data that applies globally at cluster level from the old KDCFILE of the standalone application to the UTM cluster files. You use the TRANSFER statement to specify the scope of the data to be transferred.
filebase-old
Base name of the old KDCFILE in the standalone application.
filebase-new
Base name of the new KDCFILE in the UTM cluster application.
Copy the initial KDCFILE for each node application into the corresponding node specific filebase.
Perform a KDCUPD run with the following statements for a node application’s KDCFILE:
KDCFILE OLD=filebase-old,NEW=filebase-new

        TRANSFER ...
Explanation
filebase-old
Base name of the old KDCFILE in the standalone application.
filebase-new
Base name of the node application’s KDCFILE. KDCUPD transfers the data from the old KDCFILE to the node application’s KDCFILE. You use the TRANSFER statement to specify the scope of the data to be transferred.
CAUTION!
You can only perform a KDCUPD run for a node application!When you do this, the data that applies locally at node level is transferred from the old KDCFILE of the standalone application to the node application’s new KDCFILE.
Make the UTM cluster files available at the storage location that you have specified in
the start parameter CLUSTER-FILEBASE. Make the node KDCFILEs available at the storage location that you have specified in the KDCDEF statement CLUSTER-NODE. These storage locations must be present on a medium that can be accessed by all the nodes.
In all node applications, replace the start parameters
.UTM START FILEBASE=<filebase>
required for standalone applications by the statement
.UTM START CLUSTER-FILEBASE=<cluster-filebase>.See also the section „Start parameters for openUTM“ in the corresponding openUTM manual “Using UTM Applications” for details.
Start the first node application with the KDCFILE modified in step 9.
Start the other node applications.
Adapting other UTM applications that communicate with the UTM cluster application using OSI TP or LU6.1
If UTM application 1 communicates with UTM application 2 via OSI TP or LU6.1, and you wish to convert UTM application 2 to a UTM cluster application, you should generate LPAP bundles in UTM application
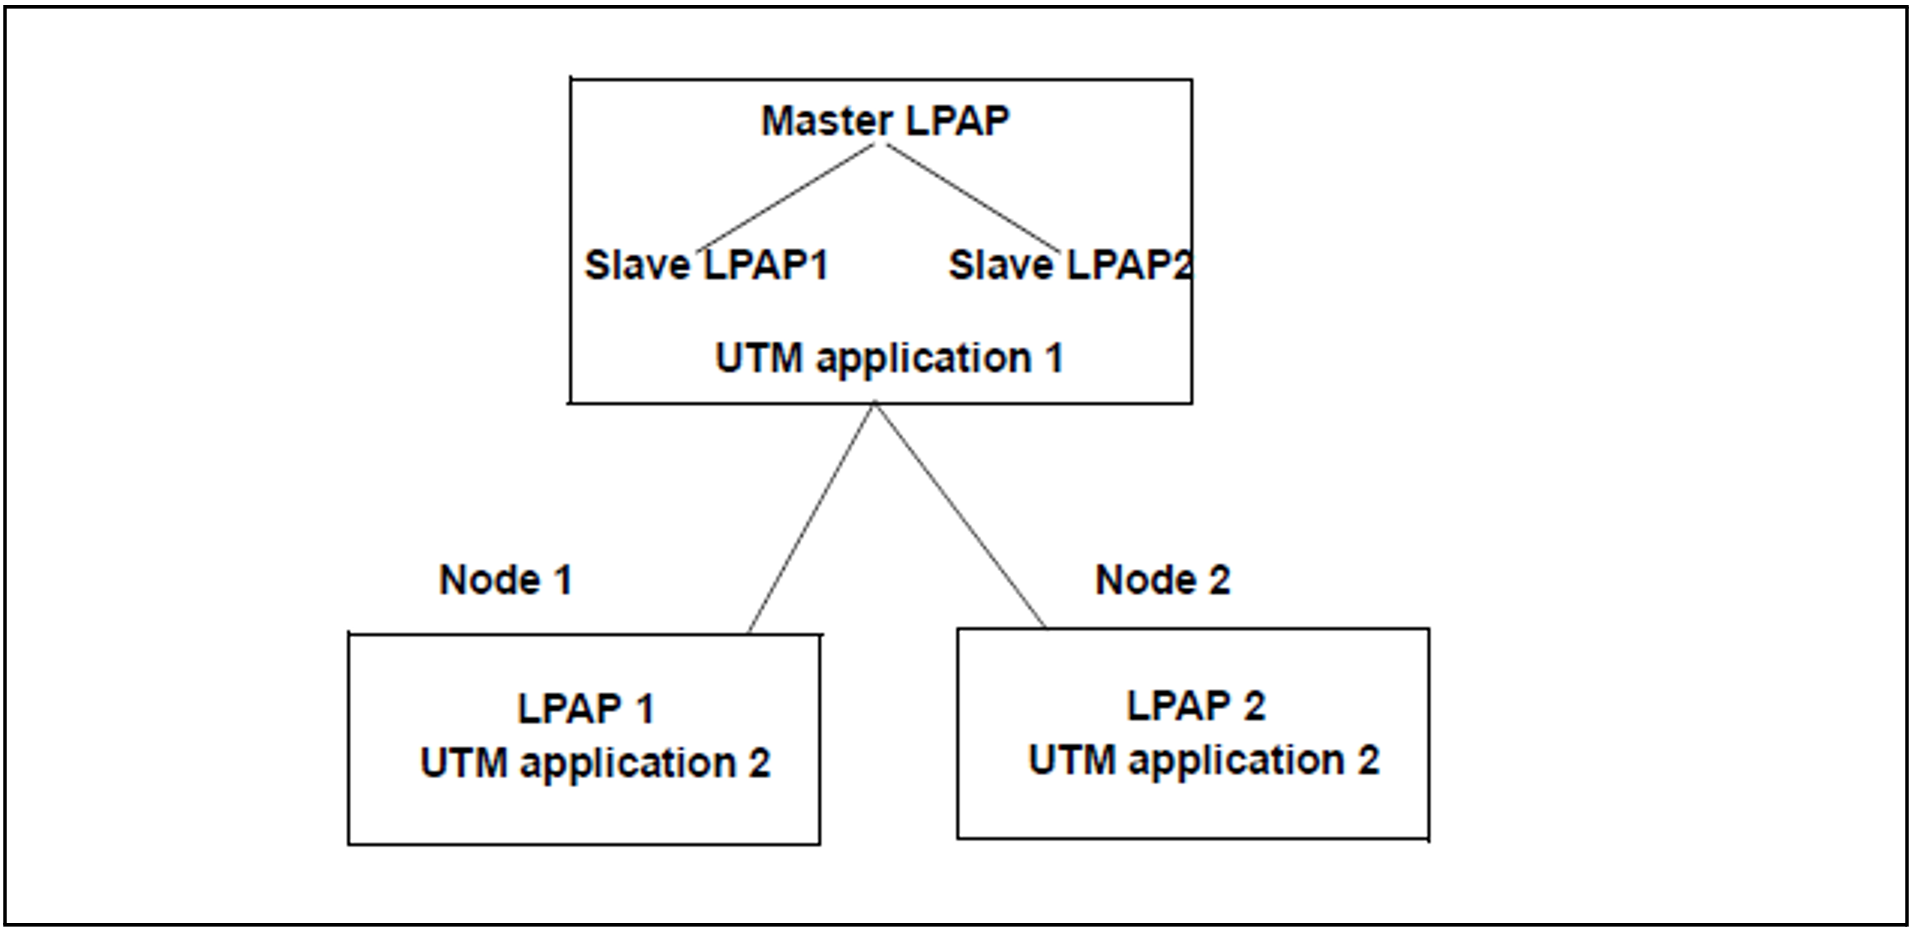
The master LPAP is addressed by application 1. The master LPAP sends messages to the slave LPAPs of the connected nodes on which application 2 is running in sequence. In this event, the LPAP bundle acts as a static load distributor.
For detailed information see section "LU6.1-LPAP bundles" and section "OSI-LPAP bundles".