The rack console contains the following in a compact 19'' slide-in housing (1 HU):
A fold-out 17'' TFT color LCD monitor with a control panel and screen menu
A keyboard with US/international assignment with an integrated number pad
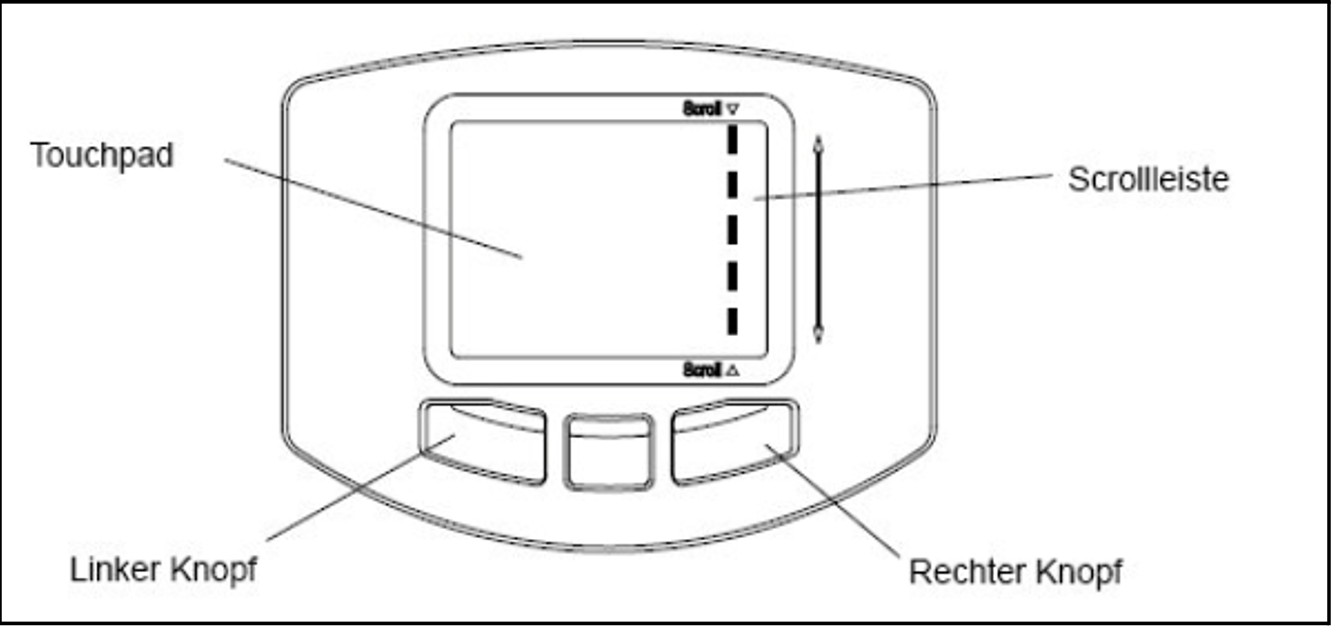
A touchpad with a scroll bar
Left and right mouse buttons
Monitor, keyboard and touchpad are protected in the slide-in module.
The rack console serves as the local console:
Entries from the rack console are normally transferred to the Management Unit.
Outputs to the rack console normally come from the Management Unit, depending on the setting of the console switch, see section "Console switch".After you have logged in on the local console, you can call the SE Manager via the local desktop's browser.
Safety instructions
Pull the rack console slowly toward you until the slide rails lock. If the slide rails are not locked, the rack console can move unexpectedly. Be careful not to catch your fingers when you pull or push on the slide module or when you open or close the LCD, etc.
Do not apply any strong force to the rack console when it is pulled out or when the monitor is opened and being used.
Do not press strongly on the monitor's screen, scratch it with sharp objects, or bring magnetic objects near it. Doing so can damage the monitor.
Note that the corners of the open device can be dangerous if bumped into. Always be careful when the device is open.
We recommend that you store the rack console in the rack when not in use.
Sliding the rack console out of the rack
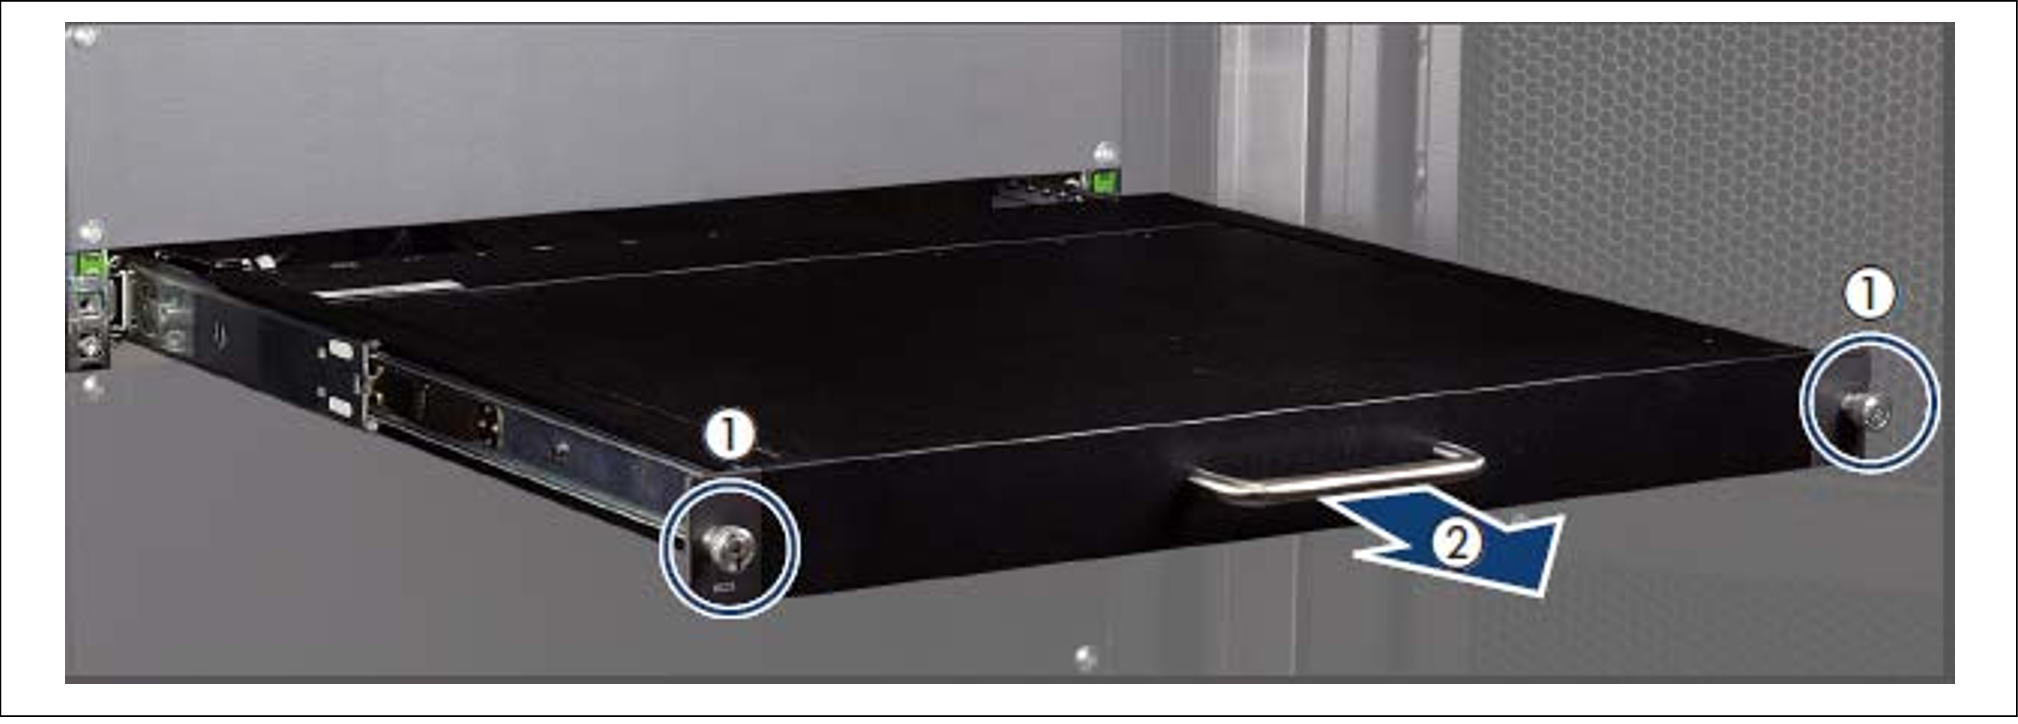
> | Loosen the finger screws (1) |
> | Pull the rack console while you hold the handle (2) until it locks into place. |
Opening the rack console
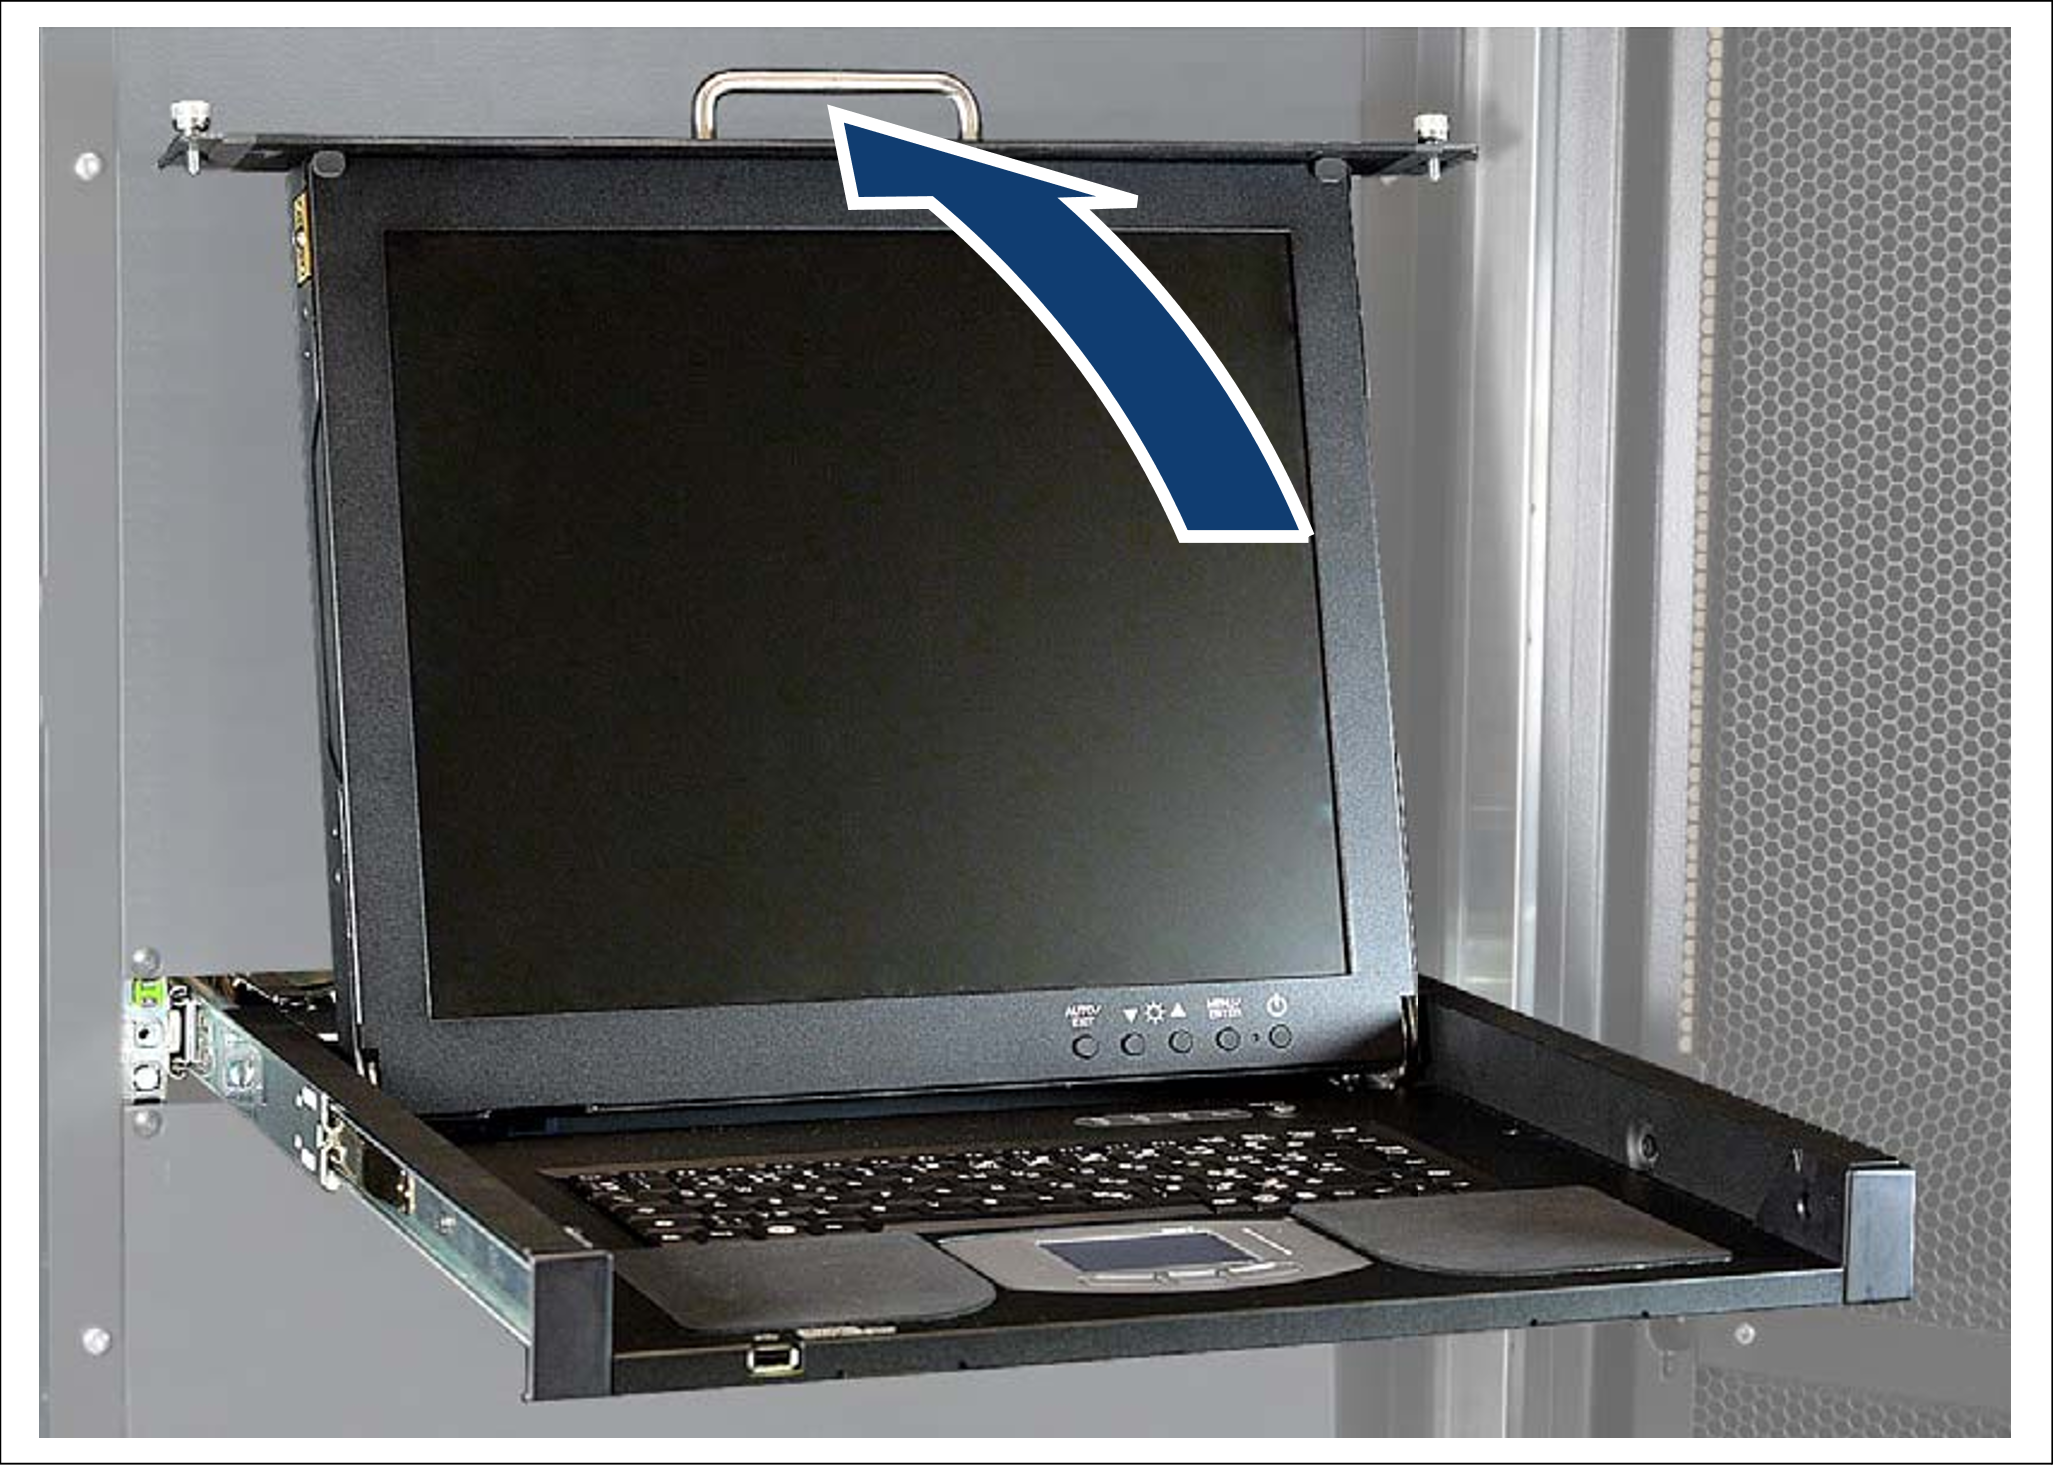
> | Use the handle to push the cover of the Rack Console up until the monitor is open at an angle of 110 degrees. |
Monitor operating panel
The operating panel is at the bottom right of the monitor.
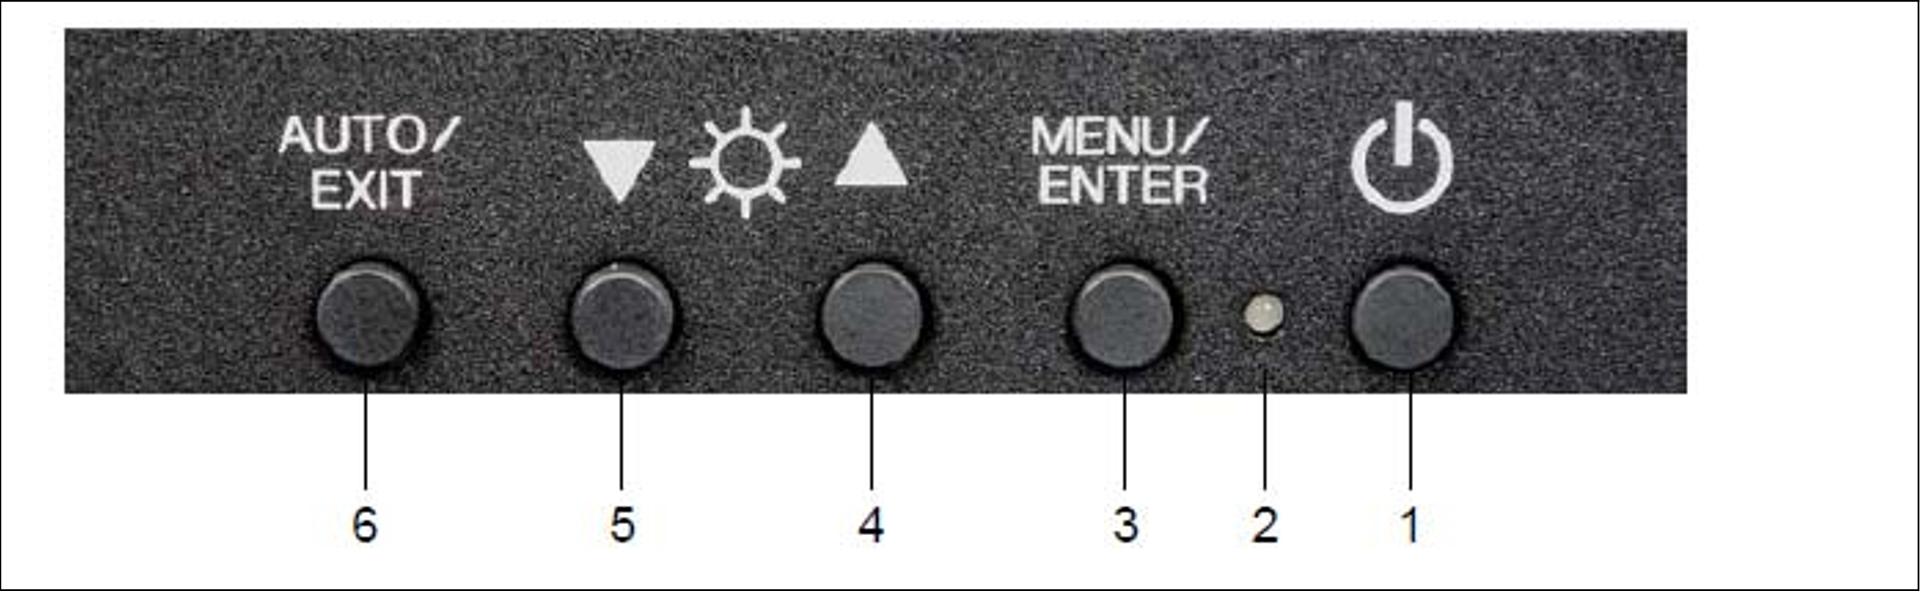
1 | Power button Press this button to turn on the power to the monitor, or, if the power is already on, to turn off the power to the monitor. |
2 | Power LED This LED lights up green when the power to the monitor is on, and lights orange when the monitor is in energy-saving mode. The light goes off when the monitor is turned off. |
3 | MENU/ENTER button Press this button to open the menu, to select an item to be adjusted, and to save an adjusted setting. |
4 | UP button Press this button to select the right-hand item or to increase the value. |
5 | DOWN button Press this button to select the left-hand item or to increase the value. |
6 | AUTO/EXIT button Press this button to close the menu, to cancel the selection of an item to be adjusted, to cancel an adjusted setting, or to perform automatic adjustment. |
It is possible to directly adjust the screen brightness by pressing the UP or DOWN button when the menu is not displayed.
It is possible to perform automatic adjustment (position and focus) by pressing the AUTO/EXIT button.
Menu control
> | Press the MENU/ENTER button (3). | |
> | Use the UP and DOWN keys (4 and 5) to go to the required menu item. | |
> | Select an item with the MENU/ENTER button (3). The list entry selected is highlighted. | |
> | Use the MENU/ENTER button (3) and the UP and DOWN buttons (4 and 5) to add the settings to the list entries selected. | |
> | Confirm each of your settings by pressing the MENU/ENTER button (3). | |
> | Quit the list entry, the menu item and the menu using the AUTO/EXIT button (6). | |
Switching the monitor on
> | Press the power button (1) to turn the monitor on. |
Notes on the LCD Display
While the on-screen display may shift, blink, or otherwise be disturbed just after the power is turned on or the OS starts up/shuts down, this does not indicate a machine failure, and the device may be used normally.
While 1280 × 1024 is the native full-screen resolution, the LCD display is full screen for all resolutions.
For resolutions other than 1280 × 1024, characters may be blurred and the thickness of thin lines can be uneven.
This is because the full-screen display is made by digital interpolation of the low-res output, not by physical magnification. This is not a machine failure, and the device may be used normally.Although there might be some always-off dots or some always-on dots, this is accepted as it is a natural characteristic of LCDs, not as a fatal imperfection. So use this device normally.
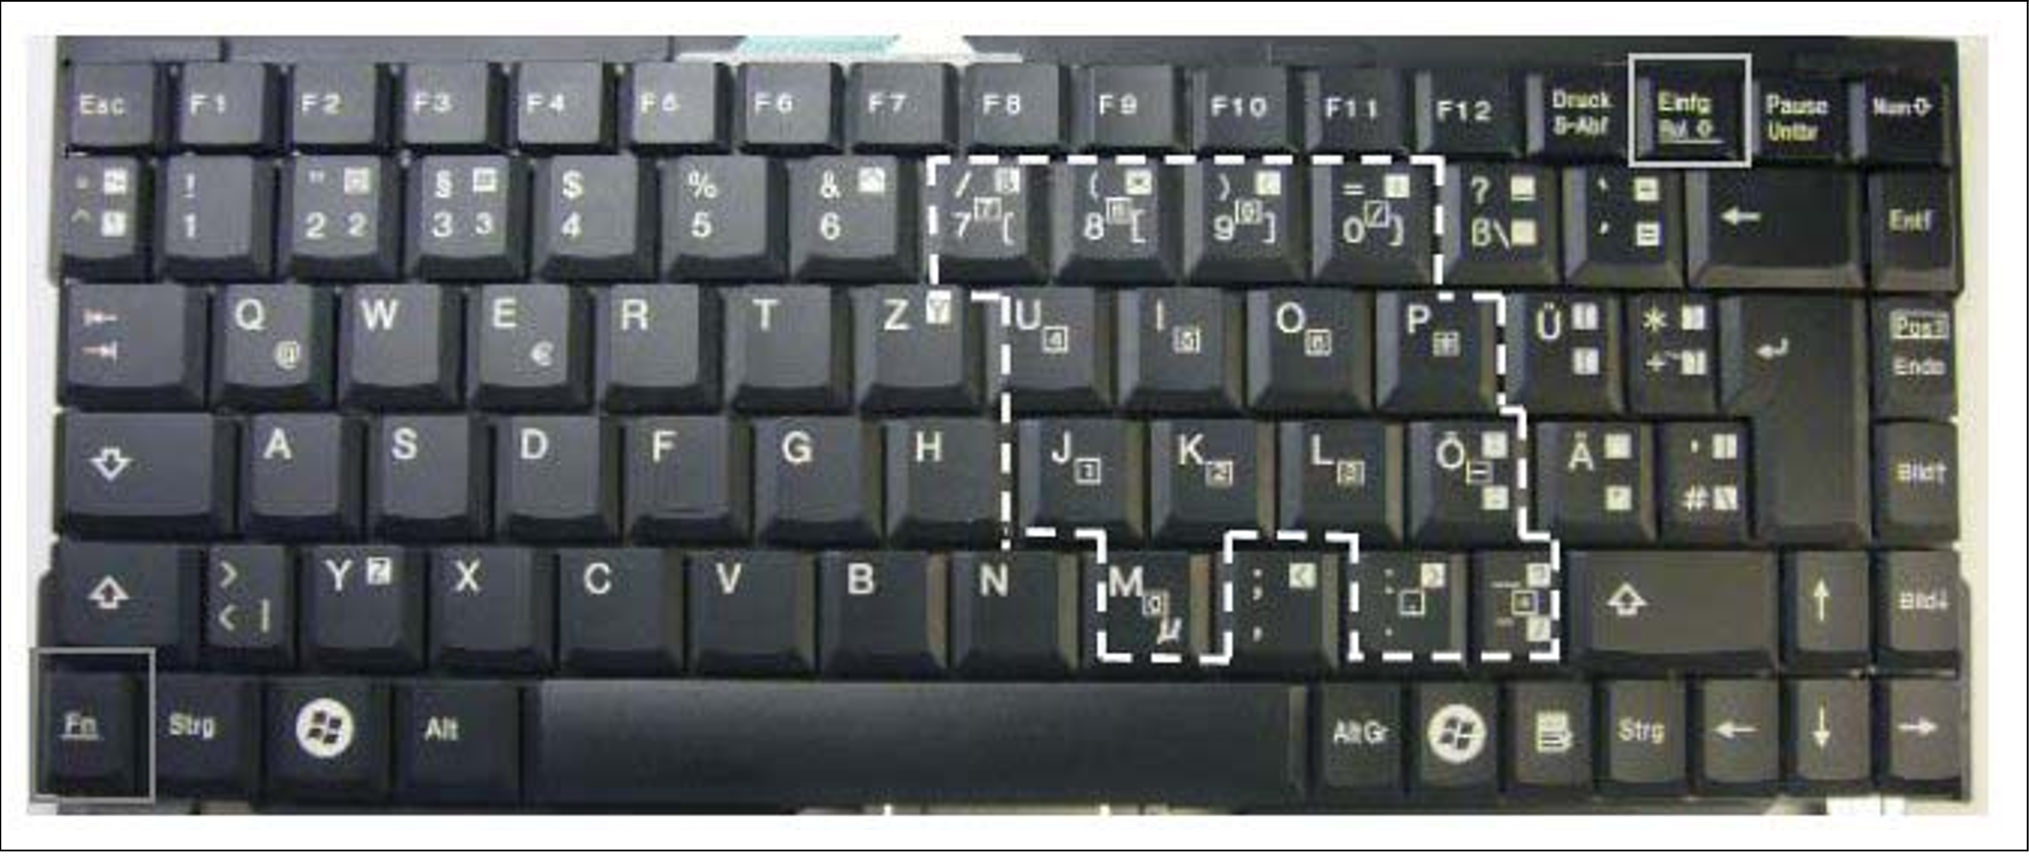
Keyboard operations
Using the Fn key on the compact layout keyboard of this device allows functions equivalent to a full keyboard.
By pressing both the Fn key and a key with underscored characters, you can use the function indicated by the characters (for example, Scr Lk, Prt Sc, and SysRq).
When the Num Lock LED is lit, the functions indicated by the enclosed characters shown on some keys are enabled.
HOT-KEY and RESET key
The following indicators and buttons are located on the right above the keyboard.
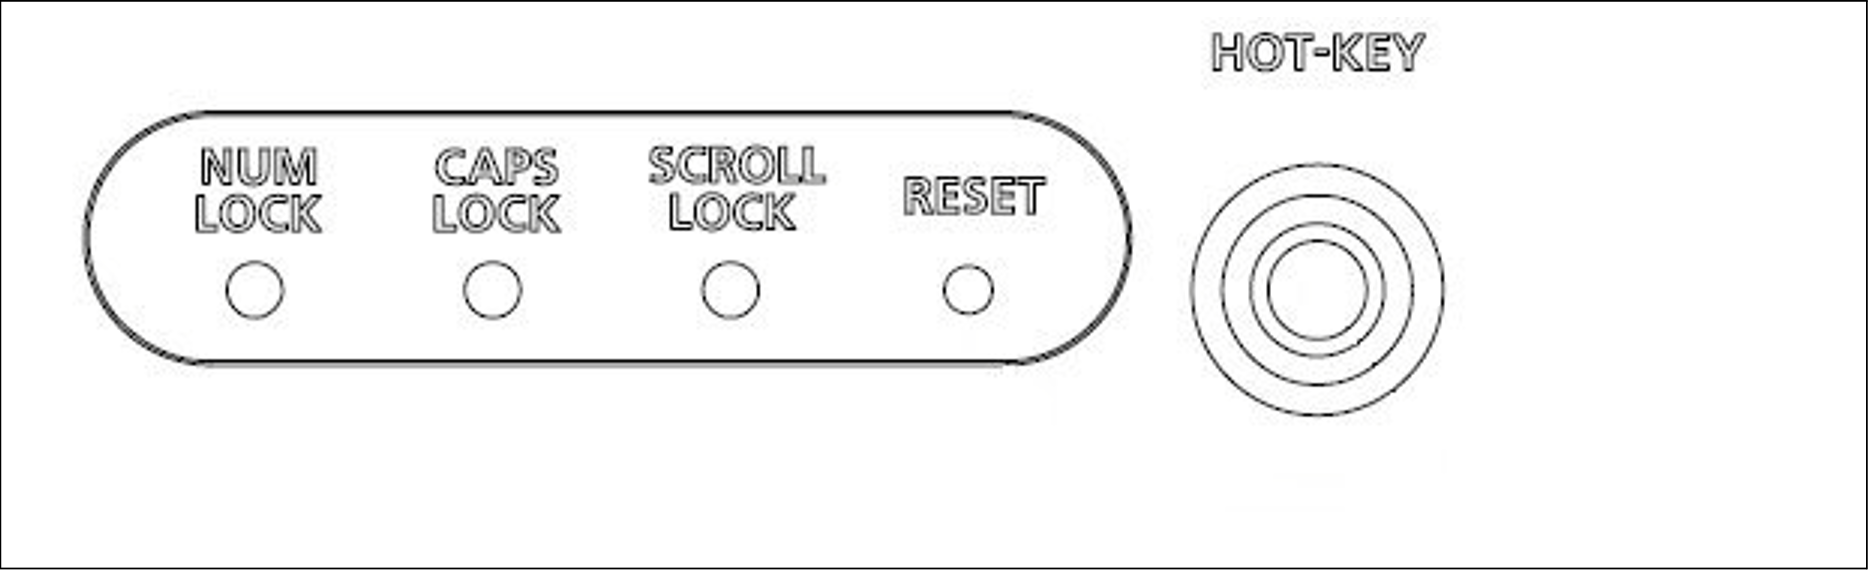
HOT-KEY | Pressing the HOT-KEY (outputs the code of the CTRL key twice) causes the menu of the connected console switch to be called. |
RESET | Resets the keyboard and pointing device on this device. |
Pointing device operations
When you operate the pointing device, touch or tap lightly on the touchpad surface.
Moving the pointer
Slide your finger lightly on the touchpad surface in the direction you want to move the cursor.
Single clicking
Lightly tap the touchpad surface once, or click the left button once.
Double clicking
Lightly tap the touchpad surface twice, or click the left button twice.
Dragging
Lightly tap the touchpad surface twice and without releasing your finger from the touchpad surface, slide your finger to move the cursor to the desired position, and then release your finger from the surface. Or, while holding down the left button, slide your finger to move the cursor to the desired position, and then release your finger from the touchpad surface.
Scrolling
Slide your finger up or down along the right edge of the touchpad surface to scroll up or down the screen.
Notes on the pointing device
The pointing device does not work correctly if you operate it in the following ways:
Operating the pointing device with a gloved finger
Operating the pointing device with a pen, ballpoint pen, or pencil
Operating the pointing device with two or more fingers
Operating the pointing device while something is on the touchpad
Operating the pointing device while water drops are on the touchpad surface, while condensation is formed on the touchpad surface, or with a wet finger
If the touchpad surface or your finger is wet, dry or wipe water well before you use the touchpad.
Do not use a pointed metal object such as a pen. Doing so may damage the touchpad surface.
Switching the monitor off
> | Press the monitor power button (see "Power button") to turn off the monitor. |
Closing the monitor
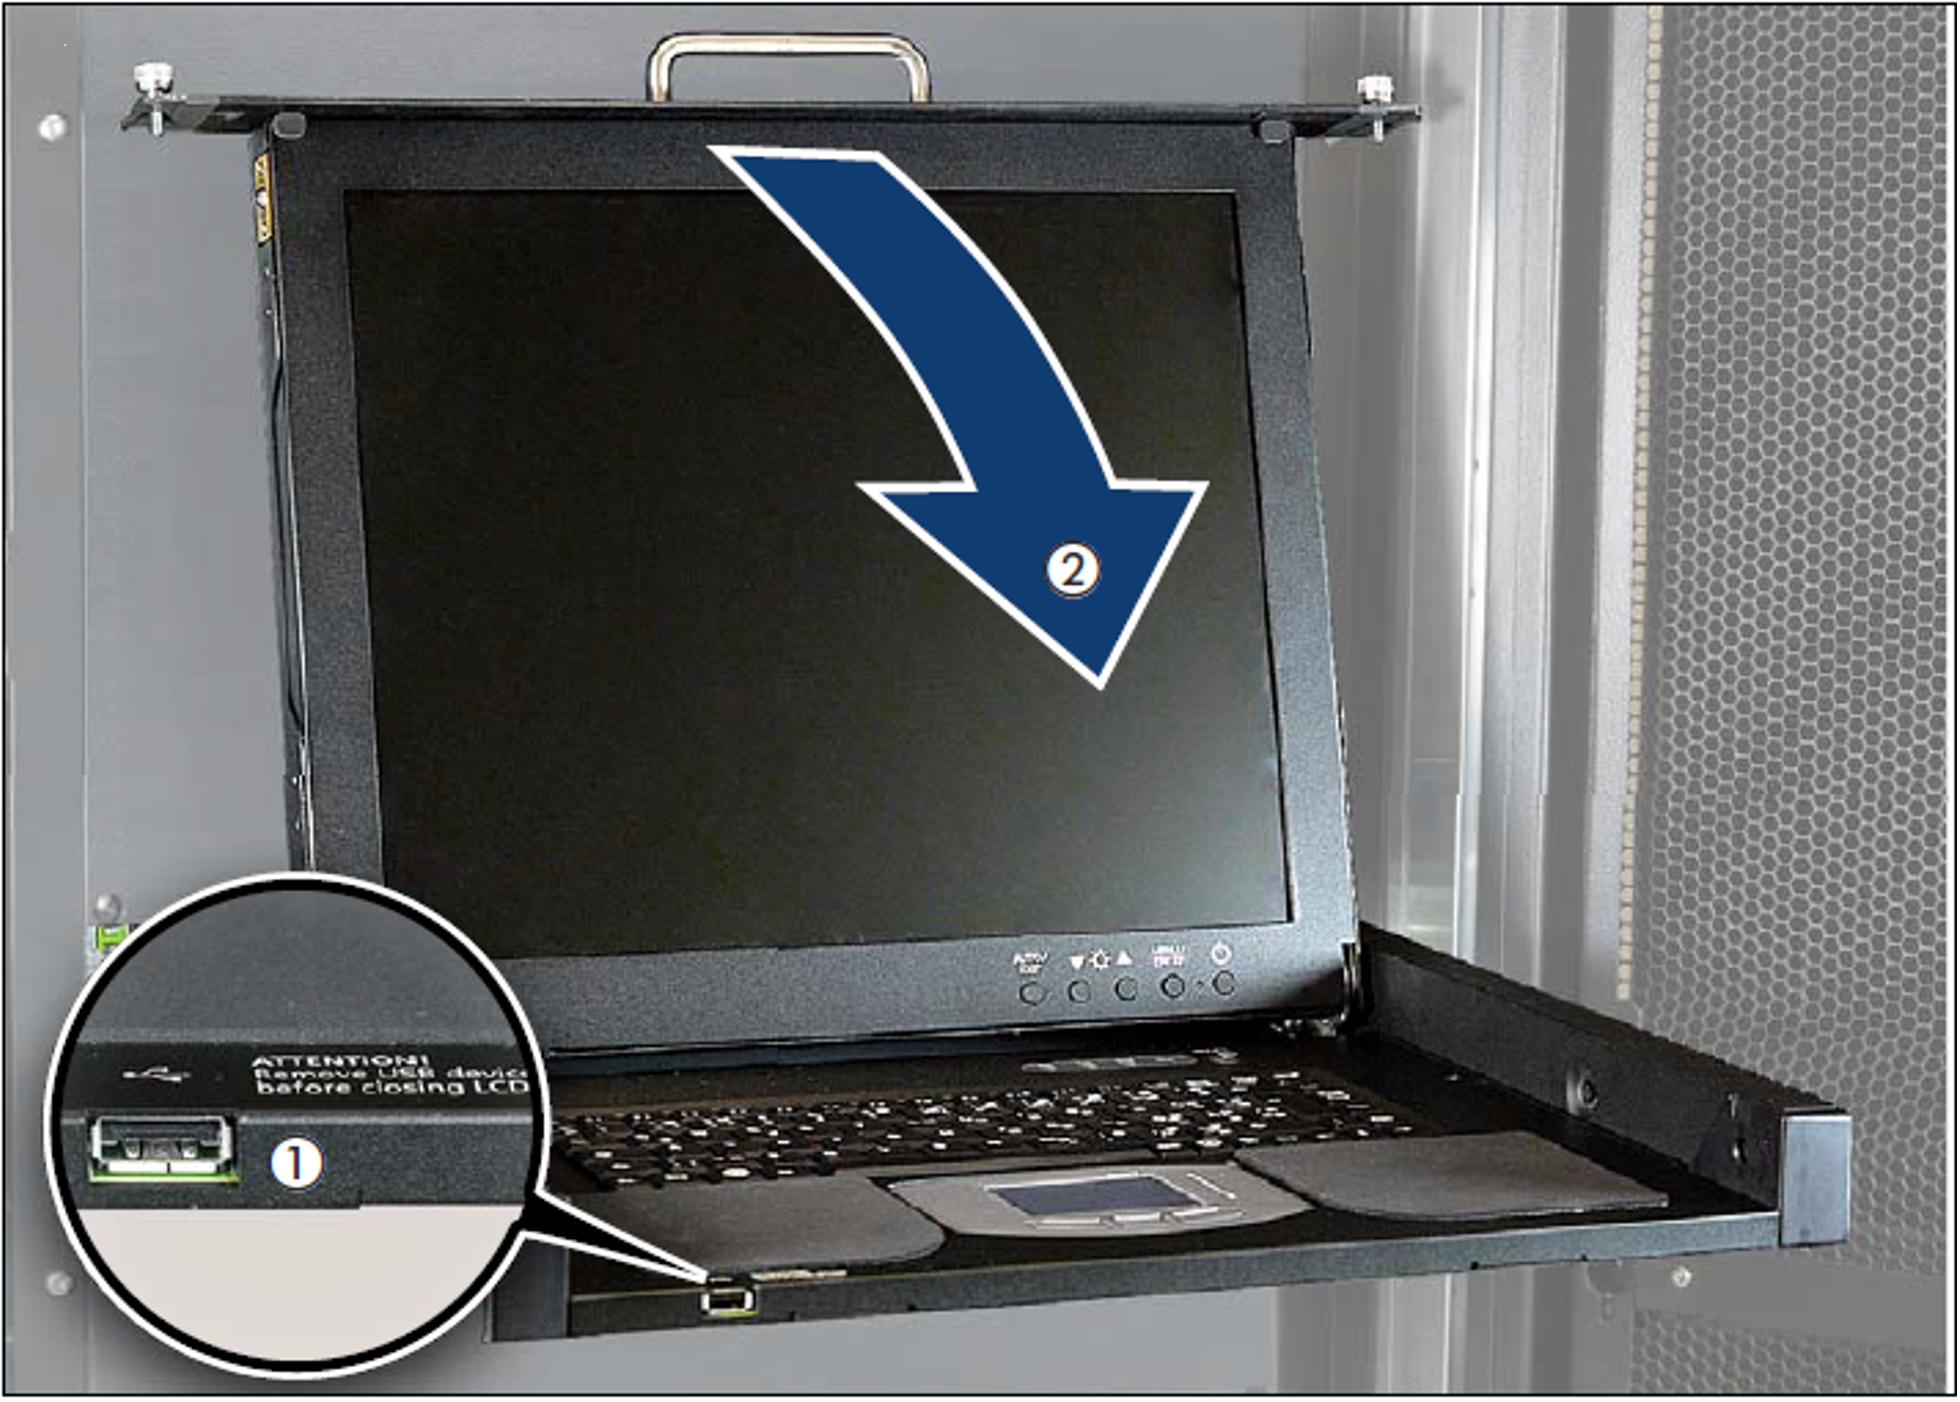
> | Make sure that the front USB connector (1) is empty before closing the monitor. |
> | Use the handle (2) to push the cover of the Rack Console carefully down until it clicks into place. |
Sliding the rack console into the rack
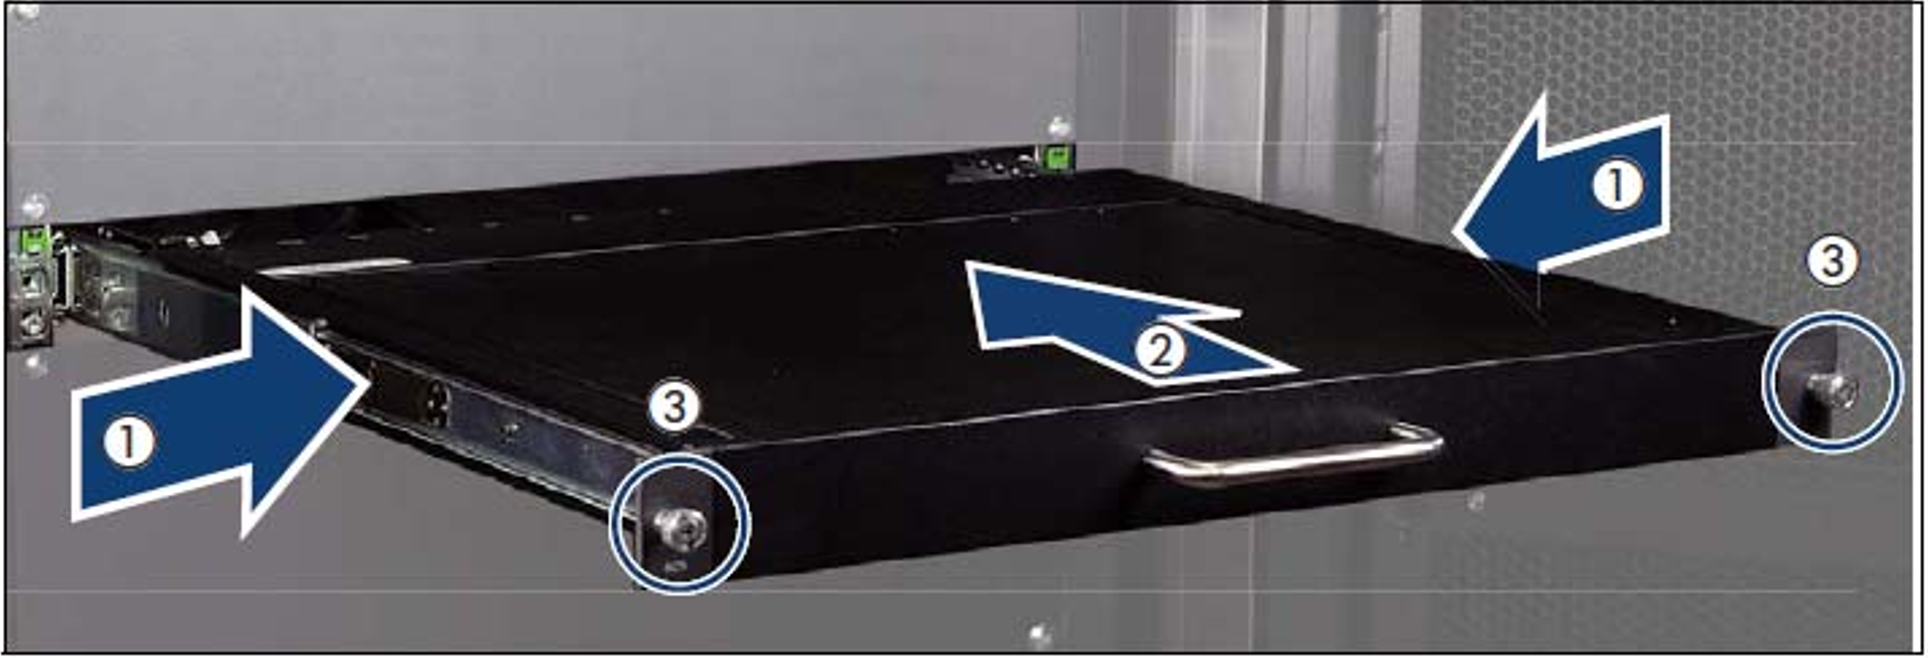
> | Press the buttons (1) to release the rack console. |
> | Use the handle to slide the rack console into the rack until it clicks into place (2). |
> | Tighten the finger screws (3) |
Troubleshooting
No image is displayed on the monitor:
Symptom | Cause | Action |
The power LED is out. | The power is not turned on. | Press the power button. |
The monitor does not function | Notify Customer Support. | |
The power LED is orange. Or, | The server is in standby mode. | |
The monitor is incorrectly | Notify Customer Support. | |
The power LED lights but no image | The rack console was turned | Turn on the device at the same |
The monitor is incorrectly | Notify Customer Support. | |
The screen flickers. | The monitor is incorrectly | Notify Customer Support. |
The monitor display looks strange:
Symptom | Cause | Action |
Grid screen that flickers. | The monitor is unfocused. | Adjust the focus of the monitor. |
Vertical stripes are visible. | Monitor adjustment is not | Adjust the clock, and then |
Sometimes no images are | The monitor is incorrectly | Notify Customer Support. |
Letter weights are different across | Focus or clock adjustment is | Adjust the clock, and then |
Monitor cannot be adjusted:
Symptom | Cause | Action |
Automatic adjustment using the AUTO/EXIT button | Automatic adjustment was | Make the monitor image as |