The tape library is by default operated via the Operator Control Panel (OCP). The LCD display of the OCP shows the tape library’s operating status and actions (e.g. “Loading”, “Rewinding” or “Moving tape”).
The tape library is protected by preinstalled IDs and passwords. Customer Support knows these IDs and passwords. You are recommended to change these passwords at startup. If you change the passwords, please ensure that the changed passwords are available when support is required.
Basic rules
OCP operation must obey some basic rules:
Any operational conflict between commands received over the BS2000 system and those entered via the OCP will be avoided with a reservation mechanism on a 'firstcome, first-served' basis. The OCP commands are stored only until a logout or automatic timeout takes place, or until Manual Mode is returned to automatically (see "Modes of the tape library").
Library firmware will not allow a user to select an impossible action, e.g.:
Moving a cartridge from any source to a full slot
Moving a cartridge from an empty slot
Loading a cartridge from any source to a full drive
Unloading a cartridge from an empty drive
Any error detected by the library or drive controller and not recoverable through predetermined firmware algorithms will be considered as fatal. An error code will be displayed on the LCD screen and the error LED will become illuminated. The error code will remain displayed until a push button is pressed on the operator control panel. This then causes the LCD screen to return to the Home Screen of the menu system.
Power-up display
When the tape library powers up after pressing th power button, or resets, it goes through several internally controlled processes that allows it to get initialized and running. These processes are called Power-On-Self-Test (POST). While the POST is happening, the LCD screen shall have appropriate information displayed to keep the user informed. When the tape library finishes coming alive, it will display the current device status for a defined time or until a key is pressed.
After this initial status screen the home screen will be shown until a key is pressed. This home screen shows the overall health of the tape library, indicating the status of the robotic and the connected drives.
Note about the LEDs
All LEDs are updated during Power Up and Reset sequences. Upon power up or software Reset, the loader will illuminate all LEDs as soon as POST allows. This will help the User to verify if all LEDs are functional. When initialization starts, all LEDs will be extinguished and the Ready/Activity LED will flash at a reasonable rate of approximately 1-second per cycle, 50% duty cycle. When the mechanical initialization is complete, the Ready/Activity LED will stop flashing and be constantly illuminated.
If a loader failure occurs, the Ready/Activity LED will be turned off and the Error LED will be illuminated. The LCD screen will also display an appropriate error code to help identify the failure.
Input modes
There are several modes to enter values in the different menu items. These values are: selectable predefined values, toggle values (e.g. On/Off) and numerical values such as network addresses.
Selectable predefined values
After the menu item has been reached, the various predefined values can be selected using the UP and DOWN keys (arrow up, arrow down). When the required value has been selected, it is entered by pressing the ENTER key.
Toggle values
Toggle values are used to switch between two different states like On and Off. After navigating to the menu item the display shows the actual state. Pressing the ENTER button will toggle to the possible new state. Pressing the ENTER button a second time will take over this new state.
Numerical values
Numerical values are needed for network addresses, PIN entries, and other configuration entries. After navigating to the menu item to be changed, the actual value will be displayed and the cursor stays on the first digit. The value may be incremented / decremented with the UP and DOWN button. After pressing the ENTER button the cursor is set to the next editable digit. It can be changed in the same way. After pressing the ENTER button at the last digit the complete entry will be stored. Pressing the CANCEL button will cancel the whole edit process and the old value is valid again.
OCP menu flowcharts
You will find the menu tree overview in other languages in the language options of the "ETERNUS LT40 S2 Quick Start Guide" available for downloading from the following website: http://www.fujitsu.com/uk :
> | Go to Support |
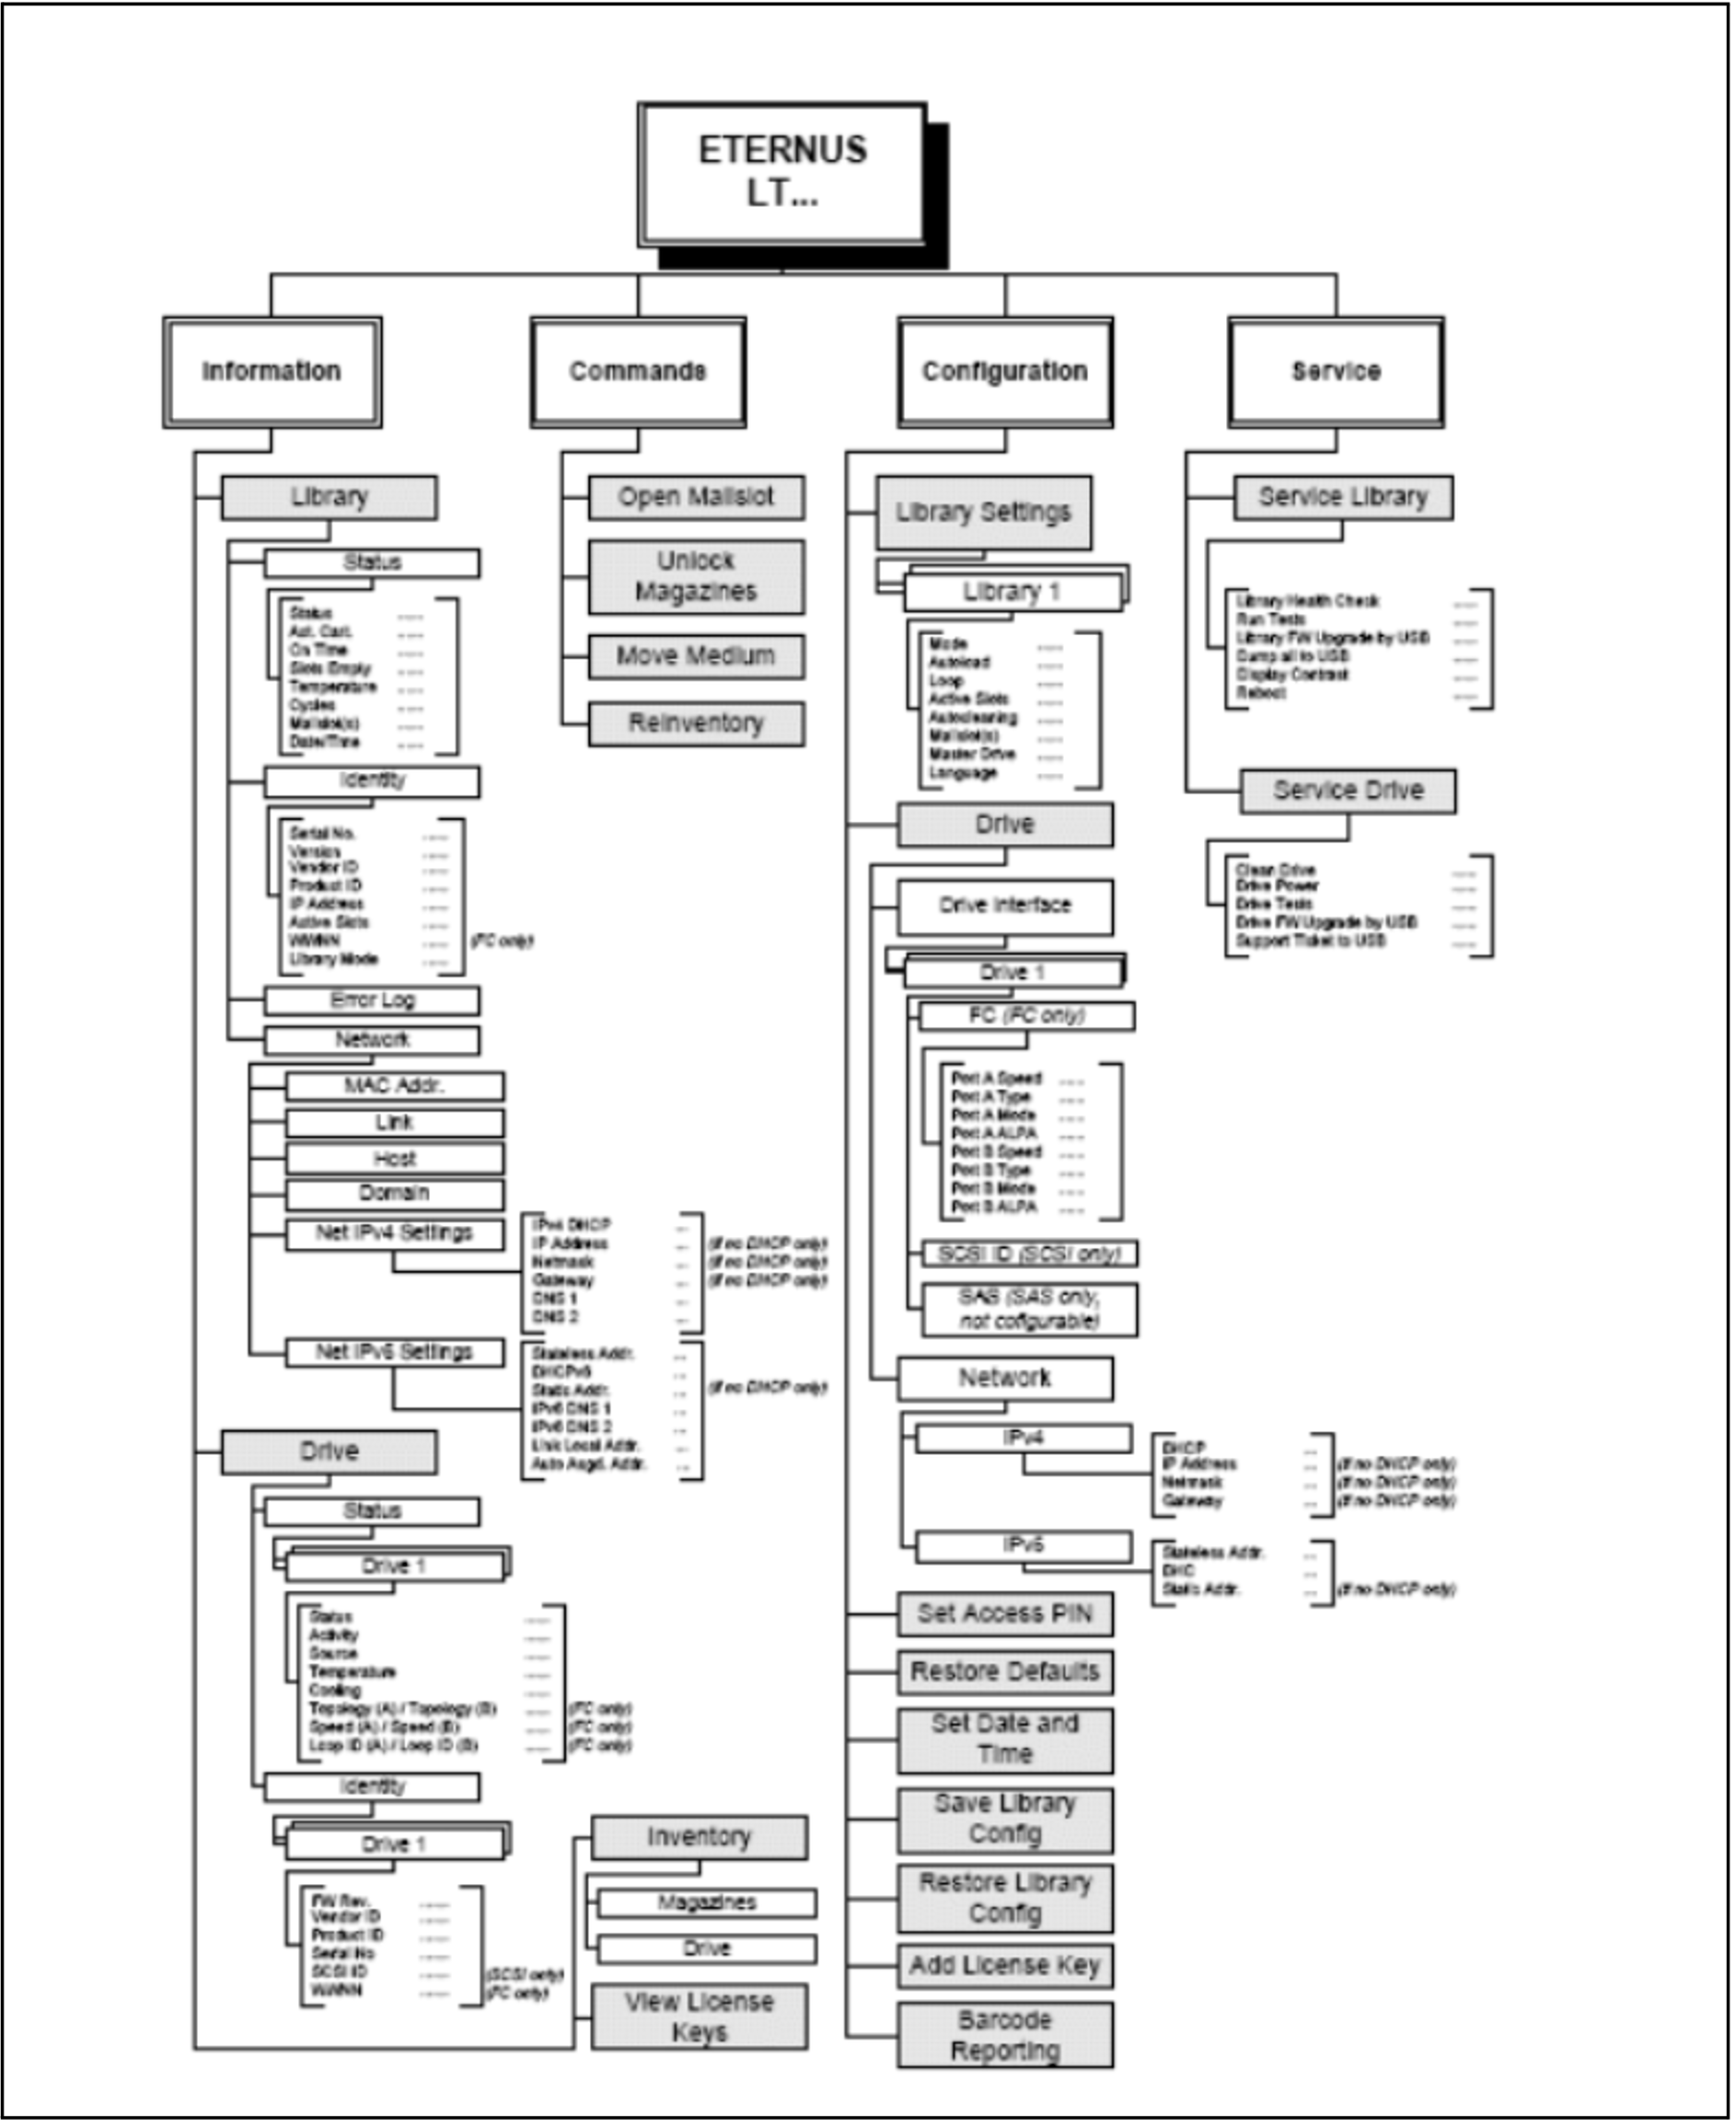
Figure 24: OCP menu flowcharts
Actions via the OCP
Some actions can be executed on the tape library using the OCP (and also via the RMU):
Opening a mailslot (menu Commands > Open Mailslot)
Unlocking a magazine (menu Commands > Unlock Magazines)
Moving cartridges between the slots (menu Commands > Move Media)
Initiating an inventory (menu Commands > Reinventory)
When the Move Media action is started, the tape library closes Random Mode and operates in Sequential Mode. Once the operation has been completed, it switches back to Random Mode. This behavior is logged on the BS2000 system, see section "Modes of the tape library".
Detach the device while BS2000 is operating (/DETACH-DEVICE) before you execute actions via the OCP.
Shutdown
Pressing the Power On/Off button will initiate a controlled Power Down of the unit.
The following operations will take place before the library shuts down completely:
The LCD display indicates with an appropriate message that the shutdown is in progress
The library finishes all ongoing library and drive activities
The robotics is moved to its home position
The library switches off the power supply's secondary side
To abort the shutdown process the user has to press the CANCEL buttor within the first 3 seconds.